Friday, June 12, 2015

Good practices for Architects, Tech Leads & Developers

As developers we often get so excited about starting work on a new project that we omit some basic planning steps that can come back to haunt us in the future. This post discusses a few practices that can help with proper planning and keeping the build process smooth, code quality good and less stress for all. 

Things might differ for you based on team size, structure, timeline, technology etc but keeping these in mind when starting a project certainly help in the long run. I have used .NET for examples but these should be applicable to any framework / project.

1. Continuous Integration: Code should be built continuously using a CI environment. Build should execute on each code check-in or at least once a day. It should execute all unit tests and send out alerts when something fails. This encourages frequent and complete code check-ins as well as encourages developers to think of the solution as a whole instead on just focusing on some component they are working on. Examples: Jenkins, Team City

2. Standardize on frameworks: Whenever possible projects should use standard 
frameworks, coding practices, tools which are agreed upon as best practice by the team and are properly documented. Something’s that can be standardized are Backend frameworks for caching, exception handling, encryption, data access, authentication etc. Front end frameworks for both web and mobile development.

3. Documentation: Avoid producing large documentation that is disconnected from the codebase and becomes obsolete very quickly. Instead focus on writing clean self-documented code. If done properly the codebase can then be used to generate documentation on the fly.

4. Document and follow good coding habits. Some examples:

  • When handling strings use concat, string formatter and StringBuilder instead of manipulating them in memory.
  • Don’t hardcode values that are reused in multiple places and might change. Use constants or configuration values.
  • When using disposable objects (streams, file handlers etc) make sure you dispose them correctly, even if there is an exception. In C# the using statement should be used in these cases. Also implement IDisposable in your own classes whenever cleanup is required.


5. Don’t create everything from scratch: Use community / built-in code and frameworks whenever possible instead of custom writing your own implementations whenever possible. These are well tested and widely used and will cause fewer headaches for you, plus handing off the code to someone else is easier. For example use Enterprise Library, NHibernate, Entity Framework, Elmah, NLog etc to instead of rolling out your own implementation.

6. Unit testing your code should not be an afterthought and should be built into the project timeline. I can’t stress the importance of properly unit tested code and how much this will improve code quality, catch issues earlier and keep the team honest.

7. Dependency Injection: Using DI instead of manual object creation all over your code will really help with testing and maintenance in the long run. 
Examples: Ninject, Autofac, StructMap 

8. Concatenate and minify all resource (javascript, css etc) files. This increases  performance by having the browser make less requests, smaller download sizes, caching and parsing the code only once. Also use sprites for images. There are some very good tools available for this including .NET bundling, grunt tasks etc

9. Don’t over architect. This is just something to be aware of. Sometimes we tend to over complicate solutions by adding multiple layers, abstractions, tiers, unnecessary design patterns into our solutions. Keeping it simple can be better than designing for every possible future enhancement. I guess am saying weigh in the pros and cons of added complexity based on the project in hand.

10. Keep your web based systems stateless as much as possible. You should discourage server side sessions and any kind of state management. Each request should include all needed data. Using this pattern we have completely automated horizontal scalability making applications scale in and out very quickly while only paying for the resources when we need them.

11. Think Security: All team members should be aware and of the OWASP Top 10 issues as most of them can be avoided very easily with good design

12. Exception Handling and Logging: Have a well-defined exception handling and logging strategy. Using frameworks like Elmah, NLog, Enterprise Library. Having a good exception handling and logging strategy will give you a lot of insight into your codebase when actual users start using it. In most cases we are able to notice issues and fix them before they propagate to the live environments. It will also save you a lot of time debugging environmental issues later.

13. Code reviews are highly encouraged. These should be considered as learning and improving exercise. Generally you do a few hour-long sessions and focus on good and bad coding patterns instead of individual pieces of code.

Do share any insights you have gained or good practices you use.

Friday, July 25, 2014

Data Repository for Entity Framework 6, MVC5 / Web API, async actions and some tricks

While there is an ongoing shift in the way applications are being built today and a lot of business and view logic seems to be shifting to the front-end it’s even more crucial to have a data layer that is lean, simple and easy to maintain. Here is one take on a data layer using Entity Framework and ASP.NET.

Entity Framework (EF) is an object-relational mapper for the .NET platform. EF bridges the gap between the data source and domain specific objects thereby eliminating a lot of code and complexity that developers have had to deal with in the past.

EF provides a very powerful layer of abstraction for data programming, eliminating the impedance mismatch between data models and languages that application developers would otherwise have to deal with.

Why choose Entity Framework?

- Increased developer productivity by relieving you of the boring and repeated task of persisting the data that you use in your applications. Also a standard way of doing things so knowledge transfer is easier.

- Developers can focus on business logic and the user experience and let EF generate the necessary database commands for reading or writing data and execute them for you in the database.

- EF is very flexible even letting you map a single entity to multiple database tables or even multiple entities to a single table.

- EF is Microsoft's recommended data access technology for new applications and its generally recommended to use going forward in place of LINQ to SQL or standard ADP.NET

Let’s look at a simple repository based approach using a code first model to perform our database operations against a SQL Server database. We will use the new async actions and a few tricks that might make your development easier. The code first approach lets you define your classes and it will figure out what you're database should look like. It’s generally a good approach for new projects without an existing database.

Let’s start with a Base Model class for all our Model objects. Out base model has an Id which is the primary key and a created and modified date.

Note: Am using latest versions of EF6.1, MVC5 and WebApi2. All our domain classes like the following Person class would inherit from our BaseModel and add properties as needed. We have set length limits on the First and Last Name which will be added to our database columns when the database is created. Required Attribute as name suggests marks the property as required. Also we have a foreign key (AddressId) to an Address table. Let’s look at the Address class now. Address is a simple class with address related properties. One thing to note here is the Persons property. It’s a collection of type Person. This property directly maps to the AddressId foreign key in the Person class and will load all Persons with the same address.

For Entity Framework to map our domain objects to a database table we will create a Data Context called MyDataContext. Notice we specify the DefaultConnection connection string in the constructor. You can turned off Lazy Loading of child properties by setting the LazyLoadingEnabled property, in which case we will explicitly load any child objects as needed instead of EF loading them for us.

Debugging: We can write all sql statements to the Debug window so we can inspect sql sent to Sql Server. This can be very helpful when debugging our code.

Changing Data before Commit: The SaveChangesAction method is called each time data is saved. This lets us modify the data right before it’s saved to the database. In this case we inspect the object and if it’s of type BaseModel we update the Modified date for add and update actions. This pattern can be used to inspect and modify data before it’s committed to the database. After the model and data context is ready you would ideally use code first migrations or a database initializer to have the database created.

Read More:

http://www.asp.net/mvc/tutorials/getting-started-with-ef-using-mvc/migrations-and-deployment-with-the-entity-framework-in-an-asp-net-mvc-application

http://www.codeguru.com/csharp/article.php/c19999/Understanding-Database-Initializers-in-Entity-Framework-Code-First.htm

Now that we have our data context and database in place let’s create a data repository that can be used across our application and will encapsulate all our database operations. We are make async database requests by using the async and await keywords, but you may use synchronous calls as well like the Get call. Ideally you would extract the repository into an interface (IBaseRepository) and inject it into all your controllers using an IOC container like Ninject, StructMap, Autofac etc. You would also inject the DataContext into the BaseRepository.

Example using Autofac: Now in my MVC or WebAPi controllers I can simply use the injected repository to perform by database operations on any domain object. Note the data repository methods that take an additional includeProperties parameter. This is used for loading additional child objects within the requested object. So loading the address property along with all Persons with name of Joe would be.

var persons = DataRepository.FindAllBy(p => p.FirstName == "Joe", p => p.Address);

Hope this can serve as a good starting point for anyone who wants to leverage Entity Framework for their .NET projects.

Friday, November 22, 2013

Tricks and Optimizations for you Sitecore website

When working with Sitecore there are some optimizations/configurations I usually repeat in order to make my app production ready.
Following is a small list I have compiled from experience, Sitecore documentation, communicating with Sitecore Engineers etc.
This is not supposed to be technically complete and might not be fit for all environments.

Simple configurations that can make a difference:
1) Configure Sitecore Caches. This is the most straight forward and sure way of increasing the performance of your website.
Data and item cache sizes (/databases/database/ [id=web] ) should be configured as needed. You may start with a smaller number and tune them as needed.
<cacheSizes hint="setting">
          <data>300MB</data>
          <items>300MB</items>
          <paths>5MB</paths>
          <standardValues>5MB</standardValues>
  </cacheSizes>

Tune the html, registry etc cache sizes for your website.


<cacheSizes>
      <sites>
        <website>
          <html>300MB</html>
          <registry>1MB</registry>
          <viewState>10MB</viewState>
          <xsl>5MB</xsl>
        </website>
      </sites>
    </cacheSizes>

Tune the prefetch cache settings under the App_Config/Prefetch/ folder.

Sample /App_Config/Prefetch/Web.Config:
<configuration>
  <cacheSize>300MB</cacheSize>
  <!--preload items that use this template-->
  <template desc="mytemplate">{XXXXXXXX-XXXX-XXXX-XXXX-XXXXXXXXXXXX}</template>

  <!--preload this item-->
  <item desc="myitem">{XXXXXXXX-XXXX-XXXX-XXXX-XXXXXXXXXXXX }</item>

  <!--preload children of this item-->
  <children desc="childitems">{XXXXXXXX-XXXX-XXXX-XXXX-XXXXXXXXXXXX}</children>
</configuration>

Break your page into sublayouts so you may cache most of them.

Read the caching configuration reference: http://sdn.sitecore.net/upload/sitecore6/sc62keywords/cache_configuration_reference_a4.pdf


2) Disable Analytics for the Shell Site
<site name="shell" virtualFolder="/sitecore/shell" physicalFolder="/sitecore/shell" 
rootPath="/sitecore/content" startItem="/home" language="en" database="core" domain="sitecore" 
loginPage="/sitecore/login" content="master" contentStartItem="/Home" enableWorkflow="true" 
enableAnalytics="false" xmlControlPage="/sitecore/shell/default.aspx" browserTitle="Sitecore" 
htmlCacheSize="2MB" registryCacheSize="3MB" viewStateCacheSize="200KB" xslCacheSize="5MB" />
 

3) Increase the Check Interval for the MemoryMonitorHook so it doesn’t run every 5 seconds (default).


<hook type="Sitecore.Diagnostics.MemoryMonitorHook, Sitecore.Kernel">
        <param desc="Threshold">800MB</param>
        <param desc="Check interval">00:05:00</param>
        <param desc="Minimum time between log entries">00:01:00</param>
        <ClearCaches>false</ClearCaches>
        <GarbageCollect>false</GarbageCollect>
        <AdjustLoadFactor>false</AdjustLoadFactor>
      </hook>
 

4) Set Analytics.PeformLookup (Sitecore.Analytics.config) to false if your environment doesn’t have access to the internet or you don’t intend to use reverse DNS lookup.
<setting name="Analytics.PerformLookup" value="false" />
 

5) Set the value of the “Media.MediaLinkPrefix” setting to “-/media”:

<setting name="Media.MediaLinkPrefix" value="-/media" />

Add the following line to the customHandlers section:
<customHandlers>
  <handler trigger="-/media/" handler="sitecore_media.ashx" />
  <handler trigger="~/media/" handler="sitecore_media.ashx" />
  <handler trigger="~/api/" handler="sitecore_api.ashx" />
  <handler trigger="~/xaml/" handler="sitecore_xaml.ashx" />
  <handler trigger="~/icon/" handler="sitecore_icon.ashx" />
  <handler trigger="~/feed/" handler="sitecore_feed.ashx" />
</customHandlers>

Link: http://squad.jpkeisala.com/2011/10/sitecore-media-library-performance-optimization-checklist/


6) Performance counters should be disabled in production if not being monitored
<setting name="Counters.Enabled" value="false" /> 


7) Disable Item/Memory/Timing threshold warnings. Due to the nature of this component, it brings no value in production.
<!--<processor type="Sitecore.Pipelines.HttpRequest.StartMeasurements, Sitecore.Kernel" />--> 

<!--<processor type="Sitecore.Pipelines.HttpRequest.StopMeasurements, Sitecore.Kernel">
  <TimingThreshold desc="Milliseconds">1000</TimingThreshold> 
  <ItemThreshold desc="Item count">1000</ItemThreshold> 
  <MemoryThreshold desc="KB">10000</MemoryThreshold> 
</processor>—>


8) The ContentEditor.RenderCollapsedSections setting is a hidden setting in the web.config file, which by default is true. Setting it to false will improve client performance for authoring environments.
<setting name="ContentEditor.RenderCollapsedSections" value="false" /> 


9) Add a machineKey section to your Web.Config file when using a web farm. Link: http://msdn.microsoft.com/en-us/library/ff649308.aspx


10) If you get errors in the log files similar to:


WARN Could not create an instance of the counter 'XXX.XXX'

(category: 'Sitecore.System')

Exception: System.UnauthorizedAccessException

Message: Access to the registry key 'Global' is denied.

Make sure the ApplicationPool user is a member of the system “Performance Monitor Users” group on the server.


11) Disable WebDAV configurations on the CD Server if not being used.

More: http://sitecoreblog.alexshyba.com/2011/04/disable-webdav-in-sitecore.html


12) Change Log4Net settings to only log Errors on content delivery environments to avoid unnecessary logging.
<root>
      <priority value="ERROR" />
      <appender-ref ref="LogFileAppender" />
    </root>
(From Sitecore: please note that this may result in Sitecore Support not being able to help you immediately due to log incompleteness. 
Logging reconfiguration might be necessary before further investigation could be performed.)
 

13) Disable Analytics for any content item that doesn’t add value. For example a page that redirects to another page.


image

image


14) When using Web User Controls avoid registering them on the page the asp.net way:

<%@ Register Src="~/layouts/UserControls/MyControl.ascx" TagName="MyControl" TagPrefix="uc2" %>

Use Sublayout web control instead – This way Sitecore caching could be leveraged

<sc:Sublayout ID="ID" Path="/layouts/UserControls/MyControl.ascx" Cacheable="true" runat="server" />


15) Avoid querying for all children recursively when all items are direct children.
Sitecore.Context.Database.SelectItems("/sitecore/content/Home//*");

//Use:

Sitecore.Context.Database.GetItem("/sitecore/content/Home");
 

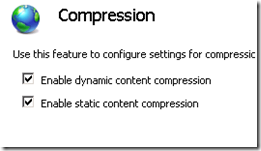
16) On IIS — you enable static & dynamic content compression on CM and CD

More: http://technet.microsoft.com/en-us/library/cc754668%28WS.10%29.aspx


image


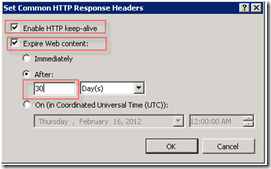
17) Enable HTTP Keep-alive and content expiration in IIS.


image


18) Use GUID’s when accessing items and fields instead of names or paths. Its faster and wont break your code when things get moved or renamed.
Context.Database.GetItem("{324DFD16-BD4F-4853-8FF1-D663F6422DFF}")
Context.Item.Fields["{89D38A8F-394E-45B0-826B-1A826CF4046D}"];

//is better than

Context.Database.GetItem("/Home/MyItem")
Context.Item.Fields["FieldName"]


Hope this helps.

Friday, November 1, 2013

Adding Facebook Open Graph Tags to an MVC Application

If you have any kind of share functionality within your application it’s a good practice to add
the basic Facebook open graph tags to the header of all pages.

For an MVC application this can be as simple as adding these tags to the Head section of the Layouts file.
<head>
    <title>@ViewBag.Title</title>
    <meta property="og:title" content="@ViewBag.FacebookTitle" />
    <meta property="og:type" content="website"/>
    <meta property="og:url" content="@ViewBag.FacebookUrl"/>
    <meta property="og:image" content="@ViewBag.FacebookImage"/>
    <meta property="og:site_name" content="Site Name"/>
    <meta property="og:description" content="@ViewBag.FacebookDescription"/>
</head> 
 
These ViewBag properties can then be populated from any action:
 
private ActionResult MyAction()
    {
        ViewBag.FacebookDescription = "My Actions Description";
        ViewBag.FacebookUrl = "My Full Url";
        ViewBag.FacebookTitle = "My Actions Title";
        ViewBag.FacebookImage = "My Actions Social Image";
        ....
    }
 
You might want to populate these ViewBag properties with default values when the actions don’t populate them. This can be done in 2 places.
 
1. In the Layout itself. (check the ViewBag properties and set them if they are empty)
 
@{
    ViewBag.FacebookTitle = ViewBag.FacebookTitle ?? "My Default Title";    
    ViewBag.FacebookUrl = ViewBag.FacebookUrl ?? HttpContext.Current.Request.RawUrl;
    ViewBag.FacebookImage = ViewBag.FacebookImage ?? "http://www.mysite.com/images/logo_main.png";
    ViewBag.FacebookDescription = ViewBag.FacebookDescription ?? "My Default Description";
}


2. Create an action filter and add it to all Controllers or your base controller.
 
public class FacebookActionFilterAttribute : ActionFilterAttribute
    {
        public override void OnActionExecuting(ActionExecutingContext filterContext)
        {
            var viewBag = filterContext.Controller.ViewBag;

            viewBag.FacebookDescription = "My Actions Description";
            viewBag.FacebookUrl = "My Full Url";
            viewBag.FacebookTitle = "My Actions Title";
            viewBag.FacebookImage = "My Actions Social Image";

            base.OnActionExecuting(filterContext);
        }
   }
 
Add attribute to your BaseController.
 
[FacebookActionFilter]
public class HomeController : Controller
 {
  ....
 }